a) check engine lights coming on (and you have checked ecu error codes)
b) engine surging and/or hesitation
c) Poor or decreased fuel econmy (vehicle running rich)
d) Failed exhaust emissions testing
e) premature failure of the cat (rotten egg smell)
f) some manufacturers recommend replacement every 90,000km
Benefits of replacing
a) Increased fuel economy (may improve fuel economy as much as 10%-15%)
b) reduce exhaust emissions (keep the tree huggin hippies happy
c) reduce the risk of costly damage to the cat (keep your walet happy)
d) ensure peak engine performance (keep you happy)
e) Decrease premature ageing of spark plugs.
What it does
Measures the presence of oxygen in the exhaust gas so that the engine ECU can adjust fuel/air ratios accordingly. Lambda is the point at which fuel and air are burned perfectly together, this is at a ratio of 14.7:1 air to fuel.
O2 sensor location:
Underneath car, screwed into drivers side of exhaust before cat, underneath drivers footwell.

Tools:
1 x 22mm spanner
1 x side cutter pliers
1 x soldering iron
Electrical tape
Factory Wiring:
94 gr, 95 gpx, (will add more as i find out)
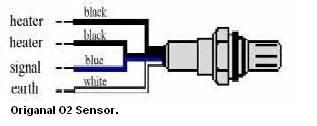
Heater wires can connect toeither one there is no negative or positive
Purchasing:
Cost anywhere from $60-$110 for sensor
Purchase new O2 sensor from repco, supercheap etc Ask for o2 senor (4 wire) for 6A12 galant. ACA brand, Part Number: OX204 (thanks ben)
or
from purchase from (ebay) here
http://cgi.ebay.com.au/OXYGEN-SENSOR-O2-SENSOR-4-WIRE-UNIVERSAL_W0QQitemZ140181839675QQihZ004QQcategoryZ72469QQcmdZViewItem
Time: 30 mins
Installing:
1) Pull gromet out from underside of car. keep pulling and a white plug should follow, disconnect plug.

2) Remove old sensor by unscrewing from exhaust. It might be tight so the use of a spray on lubricant like WD40 maybe needed (leave for a day for optimum effect).
3) Cut plug off old sensor but leave plenty of wire for reconnecting to new sensor.

4) Solder wires from plug to new sensor (if brought sensor from ebay follow this diagram)

Thanks Bennoz
All other brands will have a diagram or info on what colour wire goes to what. So just follow the diagram under factory wiring as where to wire up.
5) Tape solded connections and refit in opposite order as removed.
Side notes
The sensor after the cat is not an o2 sensor but a cat temp sensor.
Hope i havent left anything out and it helps
Disclaimer: This is an extremely easy task but i take no responsibilty for any incorrect information and by following this DIY, any work done on your vehicle is done so at your own risk...
This guide has been taken from ftoaustralia
Thank you
ReplyDeleteThis comment has been removed by the author.
ReplyDeleteGreat tips and very easy to understand. This will definitely be very useful for me when I get a chance to start my blog. RANGE REPAIR AND SERVICE IN SANTA BARBARA, CA
ReplyDelete